· 7 min read
jeesk

Elasticsearch 在竞价广告中的检索使用

一、广告定向简述

1.1 在竞价广告中的定向条件往往如下所示

  • ad1 定向为地域北京,上海,广州,深圳,18~28岁的旅游,健身行业男性,并且要求适用的操作系统为ios,android,广告出价5块
  • ad2 定向为地域成都在18~28岁的健身行业男性,并且要求适用的操作系统为ios和mac,广告出价4.8块
  • ad3 定向为在28~38岁的男性,并且要求适用的操作系统为android,广告出价5.7块
  • ad4 定向为在28~38岁,并且要求适用的操作系统为ios,广告出价5.2块

1.2 角色对应广告分析

  • 角色1: 北京,女性,健身行业,操作系统ios
  • 角色2: 广州,男性,18~28岁,旅游行业,操作系统为ios
  • 角色3: 成都,女性,28~38岁,健身行业,操作系统为ios
  • 角色4: 成都,男性,28~38岁,健身行业,操作系统为ios

1.3. 认真分析后得出下面每个角色可以推送的广告如下

  • 角色1: ad4
  • 角色2: ad1,ad4
  • 角色3: ad4
  • 角色4: ad2,ad4

往往传统数据库无法满足上述的查询时延, 大厂往往又开发自己的倒排索引系统, 为了减少成本, 可以使用elasticsearch的布尔查询.

二、使用elasticsearch 查询实时查询广告

2.1. mysql中, 如果要查询某个用户满足的广告条件如下可整理为表达式

[(不存在性别定向)|| (存在性别定向且满足条件)]
&& [(不存在年龄定向)|| (存在年龄定向且满足条件)] && [(不存在标签定向)|| (存在标签定向且满足条件)] && [(不存在地域定向)|| (存在地域定向且满足条件)] && [(不存在操作系统定向)|| (存在操作系统定向且满足条件)]

2.2 准备工具: postman 或者支持curl命令行, 一台安装了docker的机器

2.2.1 拉取es镜像,并且运行起来
docker pull docker.io/elasticsearch:7.1.1
docker run -d --name es1 -e ES_JAVA_OPTS="-Xms512m -Xmx512m" -p 9200:9200 -p 9300:9300 -e "discovery.type=single-node" b0e9f9f047e6
2.2.2 执行命令

postman或者命令行中执行 curl --location --request GET 'http://192.168.17.77:9200'

如果返回下面的文档说明你安装单机版本的elasticsearch已经安装完成

{
"name": "cc51cc2a79ce",
"cluster_name": "docker-cluster",
"cluster_uuid": "BveCHkuVTtWwr-rcWDmTpg",
"version": {
"number": "7.1.1",
"build_flavor": "default",
"build_type": "docker",
"build_hash": "7a013de",
"build_date": "2019-05-23T14:04:00.380842Z",
"build_snapshot": false,
"lucene_version": "8.0.0",
"minimum_wire_compatibility_version": "6.8.0",
"minimum_index_compatibility_version": "6.0.0-beta1"
},
"tagline": "You Know, for Search"
}

2.3. 建立广告索引,查询广告位对应广告

通常用户访问app拉取广告是以广告位为基准, 该广告位下面有n个带有定向条件的广告.那么 查询条件就是广告位id,底价+以及用户自身的属性

创建广告位id为100的索引

curl --location --request PUT 'http://192.168.17.77:9200/posfor100'

  1. 增加该索引对应的数据(类型于mysql的行数据)
北上广深,成都分别映射为 1,2,3,4,5
男女映射为1,2
操作系统ios, android,mac 映射为1,2,3
行业旅游,健身分别映射为 1,2
年龄18~28 映射为2

插入对应的4条数据,假设上面4个广告对应的id为 101,102,103,104

curl --location --request POST 'http://192.168.17.77:9200/posfor100/_doc/101' \
--header 'Content-Type: application/json' \
--data-raw '{"city":[1,2,3,4],"ageRange":[2],"gender":[1],"os":[1,2],"industry":[1,2],"price":5}'
curl --location --request POST 'http://192.168.17.77:9200/posfor100/_doc/102' \
--header 'Content-Type: application/json' \
--data-raw '{"city":[5],"ageRange":[2],"gender":[1],"os":[1,3],"industry":[2],"price":4.8}'
curl --location --request POST 'http://192.168.17.77:9200/posfor100/_doc/103' \
--header 'Content-Type: application/json' \
--data-raw '{"ageRange":[2],"gender":[1],"os":[2],"price":5.7}'
curl --location --request POST 'http://192.168.17.77:9200/posfor100/_doc/104' \
--header 'Content-Type: application/json' \
--data-raw '{"ageRange":[2],"os":[1],"price":5.2}'
  1. 假设该广告位100的底价为3块钱,使用布尔查询

角色1 对应的查询

curl --location --request GET 'http://192.168.17.77:9200/posfor100/_search' \
--header 'Content-Type: application/json' \
--data-raw '{"query":{"bool":{"filter":[{"bool":{"should":[{"term":{"gender":{"value":2,"boost":1.0}}},{"bool":{"must_not":[{"exists":{"field":"gender","boost":1.0}}],"adjust_pure_negative":true,"boost":1.0}}],"adjust_pure_negative":true,"minimum_should_match":"1","boost":1.0}},{"bool":{"should":[{"term":{"os":{"value":1,"boost":1.0}}},{"bool":{"must_not":[{"exists":{"field":"os","boost":1.0}}],"adjust_pure_negative":true,"boost":1.0}}],"adjust_pure_negative":true,"minimum_should_match":"1","boost":1.0}},{"bool":{"should":[{"term":{"city":{"value":1,"boost":1.0}}},{"bool":{"must_not":[{"exists":{"field":"city","boost":1.0}}],"adjust_pure_negative":true,"boost":1.0}}],"adjust_pure_negative":true,"minimum_should_match":"1","boost":1.0}},{"bool":{"should":[{"term":{"industry":{"value":2,"boost":1.0}}},{"bool":{"must_not":[{"exists":{"field":"industry","boost":1.0}}],"adjust_pure_negative":true,"boost":1.0}}],"adjust_pure_negative":true,"minimum_should_match":"1","boost":1.0}},{"bool":{"should":[{"term":{"ageRange":{"value":2,"boost":1.0}}},{"bool":{"must_not":[{"exists":{"field":"ageRange","boost":1.0}}],"adjust_pure_negative":true,"boost":1.0}}],"adjust_pure_negative":true,"minimum_should_match":"1","boost":1.0}},{"bool":{"filter":[{"range":{"price":{"from":3.0,"to":null,"include_lower":true,"include_upper":true,"boost":1.0}}}],"adjust_pure_negative":true,"boost":1.0}}],"adjust_pure_negative":true,"boost":1.0}}}'

得到查询条件如下, 获得了id 104的广告,即是广告4

{
"took": 403,
"timed_out": false,
"_shards": {
"total": 1,
"successful": 1,
"skipped": 0,
"failed": 0
},
"hits": {
"total": {
"value": 1,
"relation": "eq"
},
"max_score": 0.0,
"hits": [
{
"_index": "posfor100",
"_type": "_doc",
"_id": "104",
"_score": 0.0,
"_source": {
"ageRange": [
2
],
"os": [
1
],
"price": 5.2
}
}
]
}
}

角色2对应的查询

curl --location --request GET 'http://192.168.17.77:9200/posfor100/_search' \
--header 'Content-Type: application/json' \
--data-raw '{"query":{"bool":{"filter":[{"bool":{"should":[{"term":{"gender":{"value":1,"boost":1.0}}},{"bool":{"must_not":[{"exists":{"field":"gender","boost":1.0}}],"adjust_pure_negative":true,"boost":1.0}}],"adjust_pure_negative":true,"minimum_should_match":"1","boost":1.0}},{"bool":{"should":[{"term":{"os":{"value":1,"boost":1.0}}},{"bool":{"must_not":[{"exists":{"field":"os","boost":1.0}}],"adjust_pure_negative":true,"boost":1.0}}],"adjust_pure_negative":true,"minimum_should_match":"1","boost":1.0}},{"bool":{"should":[{"term":{"city":{"value":4,"boost":1.0}}},{"bool":{"must_not":[{"exists":{"field":"city","boost":1.0}}],"adjust_pure_negative":true,"boost":1.0}}],"adjust_pure_negative":true,"minimum_should_match":"1","boost":1.0}},{"bool":{"should":[{"term":{"industry":{"value":1,"boost":1.0}}},{"bool":{"must_not":[{"exists":{"field":"industry","boost":1.0}}],"adjust_pure_negative":true,"boost":1.0}}],"adjust_pure_negative":true,"minimum_should_match":"1","boost":1.0}},{"bool":{"should":[{"term":{"ageRange":{"value":2,"boost":1.0}}},{"bool":{"must_not":[{"exists":{"field":"ageRange","boost":1.0}}],"adjust_pure_negative":true,"boost":1.0}}],"adjust_pure_negative":true,"minimum_should_match":"1","boost":1.0}},{"bool":{"filter":[{"range":{"price":{"from":3.0,"to":null,"include_lower":true,"include_upper":true,"boost":1.0}}}],"adjust_pure_negative":true,"boost":1.0}}],"adjust_pure_negative":true,"boost":1.0}}}'

得到的结果

{
"took": 3,
"timed_out": false,
"_shards": {
"total": 1,
"successful": 1,
"skipped": 0,
"failed": 0
},
"hits": {
"total": {
"value": 2,
"relation": "eq"
},
"max_score": 0.0,
"hits": [
{
"_index": "posfor100",
"_type": "_doc",
"_id": "101",
"_score": 0.0,
"_source": {
"city": [
1,
2,
3,
4
],
"ageRange": [
2
],
"gender": [
1
],
"os": [
1,
2
],
"industry": [
1,
2
],
"price": 5
}
},
{
"_index": "posfor100",
"_type": "_doc",
"_id": "104",
"_score": 0.0,
"_source": {
"ageRange": [
2
],
"os": [
1
],
"price": 5.2
}
}
]
}
}

由上可得角色1获取到ad4,角色2获取到ad1,ad4, 和我们最初得到的结论是一样的2, 剩余角色3,角色4对应的广告,请各位亲自己动手验证.

三、小结

  1. 合理使用term和prefix搜索可以精准的找出复合定向条件的数据, 这对于大数据匹配来说相当好用。

参考如下

  1. 基于布尔表达式的广告索引设计
  2. Elasticsearch(Es)聚合查询(指标聚合、桶聚合)

· 7 min read
jeesk

NIO和BIO的区别总结

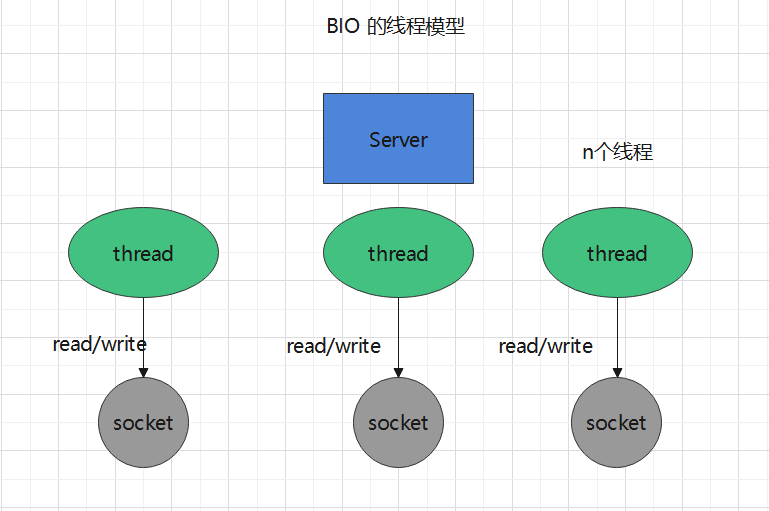
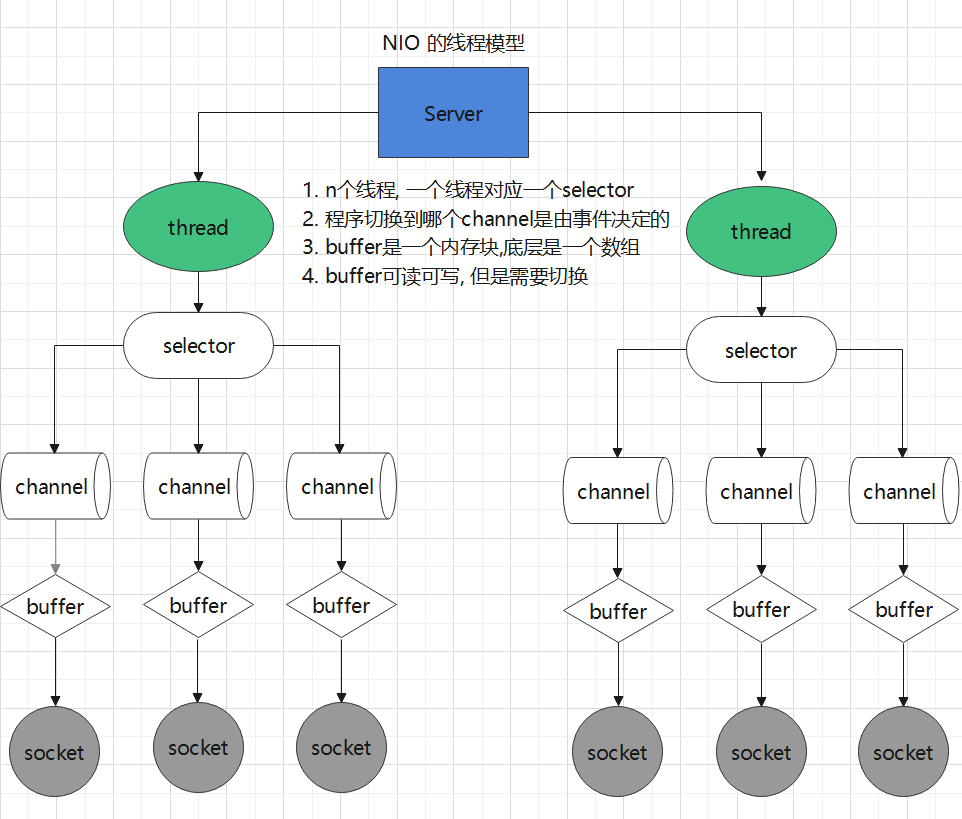
1. 表格说明两者的区别

IO类型是否阻塞同步IO线程模型
BIO阻塞一个线程对应一个请求
NIO非阻塞一个线程可以处理多个请求

2. 示意图说明区别

image-20220124015747188

代码实战

1. BIO实战

1.1 编写BIO代码

​ 目的: 实现一个server, 接受客户端发送来的消息, 并将消息返回给客户端

​ 思路:

  1. 首先创建一个ServerSocket , 并且绑定一个本地端口9999,
  2. 等待客户端连接, 然后将连接交给线程池处理
  3. 从inputStream 里面读取内容, 并且将内容使用outPutStream返回给客户端
import java.io.IOException;
import java.io.InputStream;
import java.io.OutputStream;
import java.net.InetSocketAddress;
import java.net.ServerSocket;
import java.net.Socket;
import java.util.concurrent.ExecutorService;
import java.util.concurrent.Executors;

public class BioServerTest {
public static void main(String[] args) throws IOException {

// 固定10个线程,并且创建给一个serverSocket,并且绑定端口
ExecutorService executorService = Executors.newFixedThreadPool(14);
ServerSocket serverSocket = new ServerSocket();
serverSocket.bind(new InetSocketAddress(9999));

// 接受客户端的请求, 并将客户端发送来的文字, 返回给客户端
while (true) {
// 等待其它客户端的请求, 记住这里阻塞的, 当我们启动该程序, 这里的accept 会阻塞不动, 直到成功接收一个请求
Socket accept = serverSocket.accept();
System.out.println("接受到请求");
// 将请求交给线程池处理
executorService.submit(new Runnable() {
@Override
public void run() {
InputStream inputStream = null;
OutputStream outputStream = null;
// 不同连接的hashcode , 说明是来自不同的客户端的请求
int clientHashCode = accept.hashCode();
try {
inputStream = accept.getInputStream();
outputStream = accept.getOutputStream();
byte[] bytes = new byte[1024];
int index = inputStream.read(bytes);
String s = new String(bytes, 0, index);
System.out.println("客户端:" + clientHashCode + ",发送来的消息是:" + s);
outputStream.write(("server回复: " + s).getBytes());
} catch (IOException e) {
e.printStackTrace();
} finally {
try {
accept.close();
} catch (IOException e) {
e.printStackTrace();
}
}
}
});
}

}
}

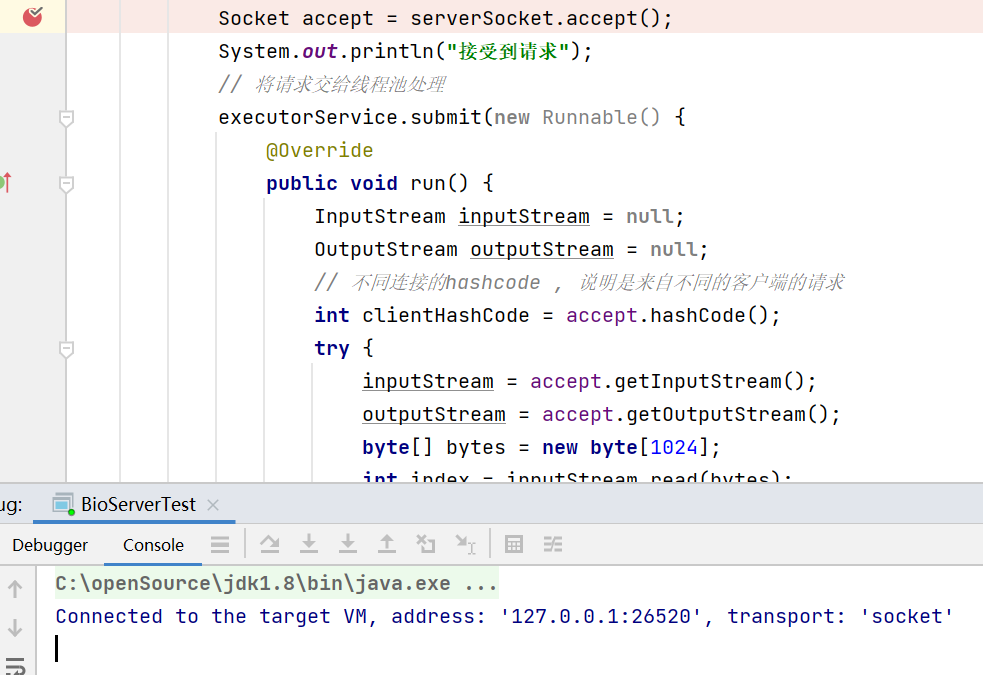
1.2 启动程序

image-20220124023401519

1.3 在命令行中连接客户端, 观察结果

image-20220124023544496

输入hello world ,期待结果返回hello world

image-20220124023633274

idea 服务端的console 如下

image-20220124023653403

2. NIO实战

​ 目的: 通过NIO 实现client和server的交互

​ 思路:

​ Server 端思路

  1. 首先创建socketServerChannel,和Selctor, 将channel 注册selector 上面去

  2. 等待客户端连接, 将客户端连接的channel注册到selctor上面去, 注意不同的channel有不同的事件

  3. 获取获取客户端channel拿到数据

​ Client 端思路

  1. 创建SocketChannel, 然后连接Server端
  2. 当连接完成后, 向Server端发送消息

2.1 编写NIO代码

2.2.1 Server端代码
import java.io.IOException;
import java.net.InetSocketAddress;
import java.nio.ByteBuffer;
import java.nio.channels.SelectionKey;
import java.nio.channels.Selector;
import java.nio.channels.ServerSocketChannel;
import java.nio.channels.SocketChannel;
import java.util.Iterator;

public class NIOServerDemo {
public static void main(String[] args) throws IOException {
ServerSocketChannel serverSocketChannel = ServerSocketChannel.open();
serverSocketChannel.configureBlocking(false);
Selector selector = Selector.open();
serverSocketChannel.bind(new InetSocketAddress(9999));
// 将serverSocketChannel的可接受事件注册到selector上面,
serverSocketChannel.register(selector, SelectionKey.OP_ACCEPT);
while (true) {
int resultCode = selector.select(1000);
if (resultCode == 0) {
System.out.println("服务器等待吧1s, 无连接");
continue;
}
Iterator<SelectionKey> iterator = selector.selectedKeys().iterator();
while (iterator.hasNext()) {
try {
SelectionKey selectionKey = iterator.next();
// 当前事件是否可接受
if (selectionKey.isAcceptable()) {
System.out.println("client 连接成功" + serverSocketChannel.hashCode());
// 拿到接受的socketChannel,将客户端channel的read事件注册到selector上面去
SocketChannel socketChannel = serverSocketChannel.accept();
socketChannel.configureBlocking(false);
socketChannel.register(selector, SelectionKey.OP_READ, ByteBuffer.allocate(1024));
}
// 当前事件是否是可读事件
if (selectionKey.isReadable()) {
// 从channel拿到消息, 并且读取出来
SocketChannel channel = (SocketChannel) selectionKey.channel();
ByteBuffer attachment = (ByteBuffer) selectionKey.attachment();
channel.read(attachment);
System.out.println("受到客户端信息:" + new String(attachment.array()));
}
} catch (Exception e) {
System.out.println(e);
} finally {
// 最好别忘了移出key
iterator.remove();
}
}
}
}
}

2.2.2 Client端代码
import java.net.InetSocketAddress;
import java.nio.ByteBuffer;
import java.nio.channels.SocketChannel;
import java.nio.charset.StandardCharsets;

/**
* socket clilent 连接server
*/
public class NIOClientDemo {
public static void main(String[] args) throws Exception {

// 创建SocketChannel, 并且连接本地9999 端口
SocketChannel socketChannel = SocketChannel.open();
InetSocketAddress inetSocketAddress = new InetSocketAddress("192.168.31.31", 9999);
socketChannel.configureBlocking(false);
if (!socketChannel.connect(inetSocketAddress)) {
while (!socketChannel.finishConnect()) {
System.out.println("连接需要时间");
}
}
System.out.println("连接server成功");
// 发server端发送消息
String str = "hello world";
ByteBuffer wrap = ByteBuffer.wrap(str.getBytes(StandardCharsets.UTF_8));
int write = socketChannel.write(wrap);
// 挂起程序
System.in.read();
}
}

2.2 启动程序

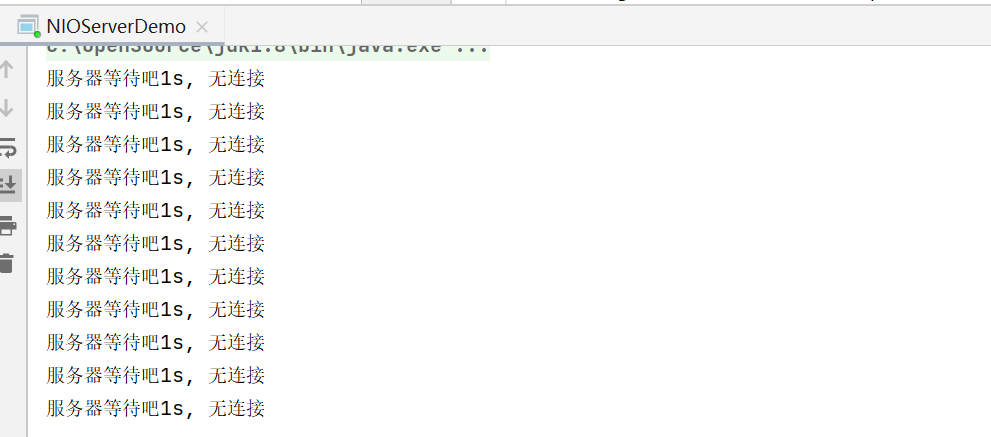
启动Server

image-20220124071414769

启动Client

image-20220124071513381

2.3 控制台观察结果

期望Server端收到 Client 端的消息

image-20220124071559323

总结

  1. 通过编写BIO 和NIO的代码可以得出, BIO是每个线程处理一个请求, 但是NIO可以一个线程处理多个请求。NIO是通过将selector的事件注册到channel上面, 然后轮询对应的key,处理不同的事件. 一个连接使用一个select线程就解决了。
  2. 在高并发的情况下面,1000个连接需要1000个线程才能连接。而BIO 一般情况下面使用 (2* cpu核)+2即可,这是因为NIO 是非阻塞的,不必等待 io阻塞,只有当写事件来的时候才会处理。显然NIO在使用少数线程的情况下对CPU时间片竞争较小,同时内存的占用也较小,随着社区的Wubflux的推进,在全异步的情况下面 Webflux能够充分利用多核CPU处理事件,提升并发量和吞吐量。在接口耗时固定IO时间固定的情况下,NIO虽然不能提升接口响应速度,但BIO的竞争相对来说更加激烈,接口耗时波动幅度很大, NIO的处理时间相对来说更加平稳,并且吞吐量是远远优于BIO。这也是为什么社区越来越推荐Webflux的原因。也可以参考我先前做过的一次压力测试。

· 4 min read
jeesk

Flink框架:Flink整合springboot

首先说一下, 为什么flink 需要集成flink, spring boot给我们带来了更好的框架整合, 同时使用spring的DI和IOC,能更好的使用bean,当然直接使用spring 整合也是一样。后来我们使用了google guice 来整合。

1. 实现原理

实现原理, spring 的启动 一般使用 AnnotationConfigApplicationContext ac = new AnnotationConfigApplicationContext(AppConfig.class); 即可启动spring 容器, 对么spring boot 呢, 看过源码的人或许知道

SpringApplication.run(arge); 只需要在启动flink之前启动sping boot 即可。

2. 代码实战

flink 整合spring boot 以及redission, 并将事件的id放入redis 中, 代码库 https://gitee.com/imomoda/flink-sprint-boot

1. spring boot 启动工具类
@SpringBootApplication(scanBasePackages = {"io.github.jeesk.flink"})
@Import(SpringUtil.class)
@Slf4j
@EnableConfigurationProperties({RedissonProperties.class, RedisProperties.class})
public class SpringBootApplicationUtil {


static SpringApplication springBootApplication = null;
static SpringApplicationBuilder springApplicationBuilder = null;

public static synchronized void run(String[] arge) {
if (springBootApplication == null) {
StandardEnvironment standardEnvironment = new StandardEnvironment();
MutablePropertySources propertySources = standardEnvironment.getPropertySources();
propertySources.addFirst(new SimpleCommandLinePropertySource(arge));
String startJarPath = SpringBootApplicationUtil.class.getResource("/").getPath().split("!")[0];
String[] activeProfiles = standardEnvironment.getActiveProfiles();
propertySources.addLast(new MapPropertySource("systemProperties", standardEnvironment.getSystemProperties()));
propertySources.addLast(new SystemEnvironmentPropertySource("systemEnvironment", standardEnvironment.getSystemEnvironment()));
if (springBootApplication == null) {
springApplicationBuilder = new SpringApplicationBuilder(SpringBootApplicationUtil.class);
// 这里可以通过命令行传入
springApplicationBuilder.profiles("dev");
springApplicationBuilder.sources(SpringBootApplicationUtil.class).web(WebApplicationType.NONE);
}
springBootApplication = springApplicationBuilder.build();
springBootApplication.run(arge);
}
}


}
package io.github.jeesk.flink;

import cn.hutool.extra.spring.SpringUtil;
import io.github.jeesk.flink.config.SpringBootApplicationUtil;
import org.apache.flink.configuration.Configuration;
import org.apache.flink.streaming.api.datastream.DataStream;
import org.apache.flink.streaming.api.environment.StreamExecutionEnvironment;
import org.apache.flink.streaming.api.functions.KeyedProcessFunction;
import org.apache.flink.util.Collector;
import org.apache.flink.walkthrough.common.entity.Alert;
import org.apache.flink.walkthrough.common.entity.Transaction;
import org.apache.flink.walkthrough.common.sink.AlertSink;
import org.apache.flink.walkthrough.common.source.TransactionSource;
import org.springframework.data.redis.core.StringRedisTemplate;

public class FraudDetectionJob {
public static void main(String[] args) throws Exception {

Configuration configuration = new Configuration();
if (args != null) {
configuration.setString("args", String.join(" ", args));
}
SpringBootApplicationUtil.run(args);

StreamExecutionEnvironment env = StreamExecutionEnvironment.getExecutionEnvironment();

DataStream<Transaction> transactions = env
.addSource(new TransactionSource())
.name("transactions");

DataStream<Alert> alerts = transactions
.keyBy(Transaction::getAccountId)
.process(new FraudDetector())
.name("fraud-detector");

alerts
.addSink(new AlertSink())
.name("send-alerts");

env.execute("Fraud Detection");
}

static public class FraudDetector extends KeyedProcessFunction<Long, Transaction, Alert> {

private StringRedisTemplate redisTemplate = null;

@Override
public void open(Configuration parameters) throws Exception {
// 初始化bean
super.open(parameters);
SpringBootApplicationUtil.run(parameters.getString("arge", "").split(" "));
redisTemplate = SpringUtil.getBean(StringRedisTemplate.class);

}

@Override
public void processElement(
Transaction transaction,
Context context,
Collector<Alert> collector) throws Exception {

Alert alert = new Alert();
alert.setId(transaction.getAccountId());
// 将id 放入redis 中
redisTemplate.opsForSet().add("tmpKey", String.valueOf(alert.getId()));
collector.collect(alert);
}
}
}

  1. 服务器端处理: flink 的安装目录下面放入logback 的包,log4j-over-slf4j-1.7.15.jar,logback-classic-1.2.3.jar,logback-core-1.2.3.jar ,
  2. 然后删除lib下面关于log4j的包 log4j-1.2.17.jar及slf4j-log4j12-1.7.15.jar), 如果不懂这些包的作用可以仔细阅读: JAVA 常见日志依赖处理细节
  3. 在代码的pom文件里面排除log4j的包
```
<dependency>
<groupId>org.apache.flink</groupId>
<artifactId>flink-java</artifactId>
<version>1.13.1</version>
<!--排除log4j-->
<exclusions>
<exclusion>
<groupId>log4j</groupId>
<artifactId>*</artifactId>
</exclusion>
<exclusion>
<groupId>org.slf4j</groupId>
<artifactId>slf4j-log4j12</artifactId>
</exclusion>
</exclusions>
<scope>provided</scope>
</dependency>
<dependency>
<groupId>org.apache.flink</groupId>
<artifactId>flink-streaming-java_2.12</artifactId>
<version>1.13.1</version>
<!--排除log4j-->
<exclusions>
<exclusion>
<groupId>log4j</groupId>
<artifactId>*</artifactId>
</exclusion>
<exclusion>
<groupId>org.slf4j</groupId>
<artifactId>slf4j-log4j12</artifactId>
</exclusion>
</exclusions>
<scope>provided</scope>
</dependency>
  1. 如果想修改flink 的logback的日志文件 , 可以在flink的conf目录下面修改下面的三个文件
logback-console.xml
logback-session.xml
logback.xml

3.参考内容

· 7 min read
jeesk

本文并不设置某个日志框架的配置,只是介绍其他日志框架和slf4j 的切换与桥接配合使用

当你的项目中有spring ,kafka, hbase , hadoop 等框架的时候, 日志依赖混乱,各种pom眼花缭乱, 看了下面的文字, 让你轻松掌握各种日志框架的混合使用和嫁接.

各种包介绍
  1. log4j

    • log4j : 实现和接口都在这个包
  2. log4j2

    • log4j-core : 核心包,日志实现

    • log4j-api : 日志api

  3. logback

    • logback-core : logback 核心包

    • logback-classic : 实现包,实现了slf4j-api

  4. commons-logging

    • commons-logging : jcl的原生全部内容

    • log4j-jcl : jcl到log4j2的桥梁 , 使用jcl的实现, 但是使用log4j2的接口

    • jcl-over-slf4j :jcl到slf4j的桥梁,使用slf4j 的api, 日志打印 实现使用jcl

日志框架包的分类

  1. api 包, 这种包只有接口, 比如slf4j-api, log4j-api ,每个日志框架都要自己api.

  2. 实现包, 比如slf4j-api 的实现有logback-classic, log4j-api的实现有log4j.

  3. 桥接器 日志统一管理使用slf4j, 但是实现用的jcl, 或者jul,或者log4j , 但是这些实现都不是slf4j的api的实现,只能提供桥接器,将slf4j 打印的日志, 交给具体的实现去操作, 这里的桥接器也可以叫做驱动.

  4. 切换器, 我需要将log4j 切换到Logback , 这个时候, 我可以使用slf4j提供的假包, 替换原有的实现类, 然后将日志重新交给slf4j管理. 比如, 项目使用的是Log4j, 那么直接使用 log4j-over-slf4j 替换log4j 即可. (其实在很多的文章中并没有切换器这个概念, 包括maven的分类中, 但是为了区分功能, 这里我还是区分出来了)

桥接器包

什么是桥接器, 就是某个日志的具体实现, 要想配合slf4j的api使用, 但是在使用slf4j 的api的打印, 无法找到对应的实现类, 这个时候需要第三方包桥接一下, 当slf4j 打印日志的时候,交给具体的日志实现类.

  1. slf4j-jdk14 :slf4j到jdk-logging的桥梁

  2. slf4j-log4j12 :slf4j到log4j1的桥梁

  3. log4j-slf4j-impl :slf4j到log4j2的桥梁

  4. logback-classic :slf4j到logback的桥梁

  5. slf4j-jcl :slf4j到commons-logging的桥梁

切换器包( 偷天换日, slf4j 提供了其他日志的包, 替换了原来的程序, 直接将日志交给了slf4j管理, 并且不需要更改代码. 但是jul 除外)

什么是切换器, 就是当一个模块使用了他自己的日志实现和api , 但是想将日志的输出交给slf4j 管理. 这个时候需要一个切换器将第三方模块的日志切换到slf4j.

  1. jul-to-slf4j :jdk-logging到slf4j的桥梁, 将jul 日志交给slf4j管理, 这个包不能和slf4j-jdk14 共存, 否则会导致无限循环.

  2. jcl-over-slf4j :commons-logging到slf4j的桥梁,commons-logging.jar替换 为 jcl-over-slf4j.jar, 将jcl的日志交给slf4j管理.

  3. slf4j-jcl.jar : 我们的一些用户在切换到 SLF4J API 后意识到,在某些情况下,JCL 的使用是强制性的,他们使用 SLF4J 可能是一个问题。对于这种不常见但很重要的情况,SLF4J 提供了 JCL 绑定,可在文件slf4j-jcl.jar 中找到。JCL 绑定会将通过 SLF4J API 进行的所有日志记录调用委托给 JCL。因此,如果由于某种原因现有应用程序必须 使用 JCL,那么您的应用程序部分仍然可以以对更大的应用程序环境透明的方式针对 SLF4J API 进行编码。您选择的 SLF4J API 对可以继续使用 JCL 的应用程序的其余部分是不可见的。 这种情况下. jcl-overslf4j.jar-不可与slf4j-jcl.jar 同时使用.

  4. log4j-over-slf4j :log4j1到slf4j的桥梁, 而只需将log4j.jar文件替换为 log4j-over-slf4j.jar.

  5. log4j-to-slf4j log4j2 到slf4j的桥梁, 将log4j2的日志移交给slf4j, 原文 原文.

日志方案:

直接使用api和实现
  1. 直接使用java common log 模块: use-jcl-log

  2. 直接使用log4j 的api和实现 模块: use-log4j

  3. 直接使用log4j2 的api和实现 模块: use-log4j2-impl-and-log4j2-api

  4. 直接使用jdk-logging 实现和api 模块: use-jdk-logging

  5. 直接使用slf4j-api和slf4j-simple简单的日志实现 模块: slf4j-sample-impl

使用slf4j自带
  1. 使用slf4j的api,没有任何实现 模块: nologImpl

  2. 使用slf4j的api, 并且同时使用slf4f-nop,和slf4j-sample 实现 模块: multilogImpl

使用第三方实现 和slf4j 的api
  1. 使用log4j 的实现,结合slf4j 的api 模块: user-log4jImpl-and-slf4japi

  2. 使用jdk的实现,结合slf4j 的api 模块: use-jdk-logging-imple-and-sl4j-api

  3. 使用 jcl 日志实现,结合slf4j的api 模块: use-jcl-imple-and-slf4j-api

  4. 使用logback的日志实现,结合slf4j的api 模块: use-logback-imple-and-slf4j-api

  5. 使用log4j2 的日志实现,结合slf4j 的api 模块: use-log4j2-imple-and-slf4j-api

日志切换器,引用的模块使用了自己的日志实现和api, 将日志输出切换到slf4j 上面 (项目中常用,常见依赖处理)
  1. jcl 切换到 slf4j , 最终由logback 打印 模块: remove-common-logging-use-slf4j

  2. log4j 切换到 slf4j ,最终由logback 打印 模块: remove-log4j-use-slf4j-and-use-logback-impl

  3. jdk logging 切换到 slf4j,最终由logback 打印 模块: remove-jdk-loggin-use-slf4j-and-logback-impl

由于作者水平有限, 出现的错误请多多包含. 烦请指点一二.

本文简书地址: https://www.jianshu.com/p/7d12a8c25a38 全文例子如下: https://gitee.com/imomoda/log4-study

· One min read
jeesk

由于kafka 的分区是物理隔离,所有只有让分区保持顺序消费。在我们的广告业务中一般情况下是让某个广告位下面的数据保持分区一致性即可。

  1. 指定partitionKey , 并且一个partition一个消费者线程
kafkaProducer.send(new ProducerRecord<>("fad-service-show", 1,id + "", id + ""));

这里的第一个参数是topic, 第二个参数是partion. 上面的消息将会分发到 fad-service-show-1 的partition中去, 在kafka consumer 的

        for (int i = 0; i < 8; i++) {
listTP.add(new TopicPartition("fad-service-show", i));
}
consumer.assign(listTP);

上面的consumer 可以指定订阅consumer的partition. 2. broker 宕机后, partition的数量不会减少, 也不会影响partitionKey的sharding. 所以说, 如果说如果一个topic , n个partition, 使用顺序消费直接指定partition即可.

· 2 min read
jeesk

__

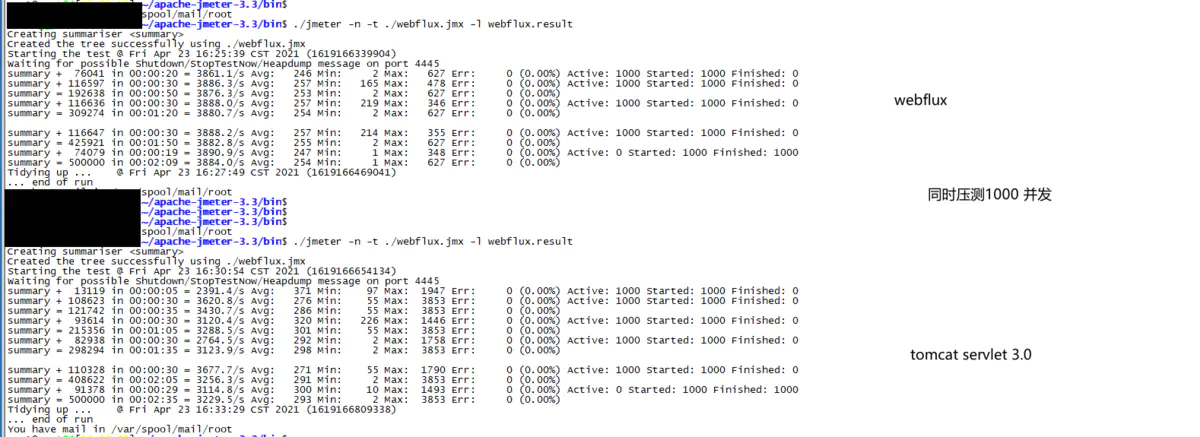
  1. 在虚拟机 8c32g ,一个tomcat 实现400~500 的并发, 3000QPS 已经快是极限, 由于是阻塞式编程, 导致响应时长的的均值和最值差距相当的大. 通过webflux 可以增加并发量, 同时吞吐量有所改善.

下面是通过jvm 调优后, 不同的web架构的压力测试图. 机器: 内网下 8c32g虚拟机 , 1台压测机器, 1台服务. 属于直连压测, 未经过网关. 下面是压测结果. img.png

  1. webflux 的吞吐量 高于传统servlet 的同步io,大约在 %10~15的效果
  2. webflux 的耗时相对于传统servlet更加均匀
  3. 耗时改善不少.

总体来说, 全异步的webflux 确实比传统的servlet 要优秀不少.

jvm 调优参数相关 使用g1垃圾垃圾回收,比较激进. 对于webflux 来说效果优化特别好.

--server.port=8081 -Xms8g -Xmx8g -Xmn4g -XX:+UseG1GC -XX:G1HeapRegionSize=16m -XX:G1ReservePercent=25 -XX:InitiatingHeapOccupancyPercent=30 -XX:+UseGCLogFileRotation -XX:NumberOfGCLogFiles=5 -XX:GCLogFileSize=30m -Xloggc:/dev/shm/mq_gc_%mxs.log

· 3 min read
jeesk

指标:

  1. 性能指标: 吞吐量,响应速度
  2. 响应时间: 平均响应时间, 百分数
  3. 并发量
  4. 秒开率
  5. 正确性

linux 系统 top - 1: us: 用户的态所占百分比 sy: 系统态所占百分比 ni: 高优先级应用所占百分比 id: cpu 空闲百分比 hi: 硬中断百分比 si: 软中断百分比 st: 宿主机队虚拟机的影响 wa: io 等待磁盘,写入写出

load average: 表示1 分钟, 5 分钟 15 分钟的负载

vmstat : vmstat 3 60 , 表示3秒刷新一次, 持续60秒 b 列读写磁盘 si/so: 交换分区对性能的影响 cs: 上下文切换

查看内存信息: /proc/meminfo 查看CPU信息: /proc/cpuinfo jvm 预先分配内存: -XX:+AlwaysPreTouch 使用nmon 工具: m加入内存,c加入cpu,n 加入网络,d加入磁盘

-Dcom.sun.management.jmxremote.port=14000 -Dcom.sun.management.jmxremote.authenticate=false -Dcom.sun.management.jmxremote.ssl=false

性能的几个测试工具: nmon : 系统性能 jconsole / visualVm : java 线程 jcmd : java 应用详细数据 arthas: 单个请求链的详情 wrk: 压力测试 2 个线程. 100 个连接 持续10 s wrk -t2 -c10 -d10s http://qf.csmxwl.com/fund/index/dj

[root@ggpt06 wrk]# ./wrk -t2 -c20 -d3s http://qf.csmxwl.com/fund/index/dj   
Running 3s test @ http://qf.csmxwl.com/fund/index/dj
2 threads and 20 connections
Thread Stats Avg Stdev Max +/- Stdev
Latency 1.32s 639.51ms 1.83s 75.00%
Req/Sec 1.00 0.82 2.00 42.86%
7 requests in 3.00s, 415.46KB read
Socket errors: connect 0, read 0, write 0, timeout 3
Requests/sec: 2.33
Transfer/sec: 138.37KB

12 threads and 100 connections: 总共是12个线程,100个连接(不是一个线程对应一个连接) latency和Req/Sec: 代表单个线程的统计数据,latency代表延迟时间,Req/Sec代表单个线程每秒完成的请求数,他们都具有平均值, 标准偏差, 最大值, 正负一个标准差占比。一般我们来说我们主要关注平均值和最大值. 标准差如果太大说明样本本身离散程度比较高. 有可能系统性能波动很大. 23725 requests in 30.05s, 347.47MB read 在30秒之内总共有23725个请求,总共读取347.47MB的数据 Socket errors: connect 0, read 48, write 0, timeout 50 总共有48个读错误,50个超时. Requests/sec和Transfer/sec 所有线程平均每秒钟完成了789.57个请求,每秒钟读取11.56MB数据量

Guava : weakValue,weakKey 当没有任何强引用,与 key 或者 value 有关系时,就删掉整个缓存项。这两个函数经常被误解。

  1. maxumumSize
  2. initalCapacity

· 9 min read
jeesk
        ThreadPoolExecutor threadPoolExecutor = new ThreadPoolExecutor(
5,
10,
20,
TimeUnit.MINUTES,
new SynchronousQueue<Runnable>(),
new ThreadFactory() {
@Override
public Thread newThread(Runnable r) {
return new Thread();
}
},
new RejectedExecutionHandler() {
@Override
public void rejectedExecution(Runnable r, ThreadPoolExecutor executor) {

}
});

按照上面参数顺序讲解

  1. $\color{#FF0000}{corePoolSize 核心线程池数量 }$
  • 创建线程池的时候没有线程, 当提交任务的时候会陆续创建线程, 当corePoolSize 满的时候, 会将任务放到队列中去, 队列满了, 那么会继续创建 corePoolIsze 到maxPoolSize之间的线程 .
  • 设置allowCoreThreadTimeout=true(默认false)时,核心线程会超时关闭
  • prestartAllCoreThread 或者prestartAllCoreThread 初始化核心线程
  1. $\color{#FF0000}{maxPoolSize最大线程池数量}$
  • 当线程数量 = maxPoolSize , 且任务队列已经满了, 线程池会拒绝任务抛出一场
  • 我们的项目 这个参数是 Runtime.getRuntime().availableProcessors() * 4 +1 , 根据压力测试获得最好的最大核心数量
  1. $\color{#FF0000}{keepAliveTime 线程空闲时间}$
  • 空闲的线程能够保持空闲的时间, 超过这个时间, 这一部分线程将被回收.
  • 核心线程到最大线程数量的差异, 如果两个值相等, 那么这个参数毫无意义.
  1. $\color{#FF0000}{BlockingQueue 阻塞队列}$
  • 当核心线程数达到最大时,新任务会放在队列中排队等待执行
  • 常见的队列
    1. ArrayBlockingQueue: 有界队列,基于数组结构,按照队列FIFO原则对元素排序;
    2. LinkedBlockingQueue:无界队列,基于链表结构,按照队列FIFO原则对元素排序,Executors.newFixedThreadPool()使用了这个队列
    3. SynchronousQueue 同步队列, 该队列不存储元素,每个插入操作必须等待另一个线程调用移除操作,否则插入操作会一直被阻塞,Executors.newCachedThreadPool()使用了这个队列;
    4. PriorityBlockingQueue:优先级队列,具有优先级的无限阻塞队列。

6 . $\color{#FF0000}{ThreadFactory 线程工厂}$

  • 自定义线程的名字,daemon,优先级等
  1. $\color{#FF0000}{rejectedExecutionHandler 拒绝策略}$
  • 这里的拒绝可以采取你自定义的办法, 比如使用second 线程池处理 r , 或者丢弃r, 或者打印出日志, 取决于你的业务.
  • 线程池执行拒绝的两种情况
    1. 当线程数量达到maxPoolSize , 队列已经满了, 会拒绝新任务
    2. 当线程池调用shutdown 的时候, 会等待线程池的任务执行完毕, 再shutdown, 这是一种优雅的方式. 调用shutdown和shutdown关闭之前, 这段时间会拒绝新任务. shutdownNow, 会立刻关闭, 并且停止执行任务. 和shutdown 有很大区别.
  • 几种拒绝策略
    1. AbortPolicy 丢弃任务, 抛运行异常(如果不设置, 默认就是这一个策略)
    2. CallerRunsPolicy 执行任务
    3. DiscardPolicy 忽视,什么都不会发生
    4. DiscardOldestPolicy 从队列中踢出最先进入队列(最后一个执行)的任务

线程执行的一些流程

  1. 如果当前线程池中的线程数目 小于 < corePoolSize 。则对于每个新任务,都会创建一个线程去执行这个任务(即使core线程中也有空闲线程, 也会新创建线程会执行)。
  2. 如果当前线程池中的线程数目 大于等于 >= corePoolSize 。 对于每个新任务,会将其添加到任务队列中。若添加成功,则任务由空闲的线程主动将其从队列中移除后执行。若添加失败(任务队列已满),则尝试创建新的线程执行。
  3. 若当前线程池中的线程数目到达 maximumPoolSize ,则对于新任务采取拒绝策略。
  4. 如果线程池中的数量大于 corePoolSize 时,如果某个线程空闲时间超过 keepAliveTime ,线程会被终止,直到线程池中的线程数目不超过 corePoolSize 。
  5. 如果为核心线程池中的线程设置存活时间,则当核心线程池中的线程空闲时间超过 keepAliveTime ,则该线程也会被终止
  6. 如果核心线程数已经达到, 如果没有队列没有满的话, 是不会创建新的线程. 有时候取决你使用什么队列. 比如使用 ArrayBlockingQueue(10), 当核心线程已经创建完成, 只有当队列满了之后才会继续创建新的线程. 如果你使用的是SynchronousQueue, 内部只能一个的队列,那么只有队列直接创建core线程到maxpoolSize 之间的线程

线程池性能优化建议

  1. 建议使用 prestartAllCoreThread 或者prestartAllCoreThread 初始化核心线程
  2. 考虑 allowCoreThreadTimeOut 允许核心线程能够回收节约机器的使用.
  3. 拒绝策略可以将任务, 提交给 second 线程池处理.
  4. 自定义ThreadFactory ,标识线程, 方便排查线程的使用情况

关于线程异常是否处理的问题:

  1. execute : 如果不手动捕获一场, 线程池只能重新创建新的异常来填补空白,重新创建线程这是有代价的
  2. submit: 因为能够调用 future.get(). 所以有异常也会捕获, 不会造成线程终止.
// 证明execute 的异常
@Test
public void test1() throws InterruptedException {
Thread.setDefaultUncaughtExceptionHandler((Thread t, Throwable e) -> {
log.warn("Exception in thread {}", t, e);
});
String prefix = "test";
ExecutorService threadPool = Executors.newFixedThreadPool(1, new ThreadUtil.ThreadFactoryImpl(prefix));
IntStream.rangeClosed(1, 10).forEach(i -> threadPool.execute(() -> {
if (i == 5) {
throw new RuntimeException("error");
}
log.info("I'm done : {}", i);
System.out.println(Thread.currentThread().getName() + " I'm done : " + i);
if (i < 5) {
Assert.assertEquals(prefix + "1", Thread.currentThread().getName());
} else {
Assert.assertEquals(prefix + "2", Thread.currentThread().getName());
}

}));
threadPool.shutdown();
threadPool.awaitTermination(1, TimeUnit.HOURS);
// 本来是通过test 1 线程执行的, 后面出现异常 确是test2 执行的, 说明x线程已经终止2, 并且重新创建线程
}
// 线程名称没有变, 说明已经帮你捕获异常.
String prefix = "test";
ExecutorService threadPool = Executors.newFixedThreadPool(1, new ThreadUtil.ThreadFactoryImpl(prefix));
List<Future> futures = new ArrayList<>();
IntStream.rangeClosed(1, 10).forEach(i -> futures.add(threadPool.submit(() -> {
if (i == 5) {
throw new RuntimeException("error");
}
log.info("I'm done : {}", i);
// if (i < 5) Assert.assertEquals(prefix + "1", Thread.currentThread().getName());
// else Assert.assertEquals(prefix + "2", Thread.currentThread().getName());
})));

for (Future future : futures) {
try {
future.get();
} catch (ExecutionException e) {
log.warn("future ExecutionException", e);
}
}
threadPool.shutdown();
threadPool.awaitTermination(1, TimeUnit.HOURS);

面试问题

  1. 说说线程池的核心参数有哪些
  2. 说说你们的corePoolSize 的数量是如何设置,超时时间如何设置
  3. 你们使用的是什么队列, 为什么使用这个队列.
  4. 你们项目是如何优化自己的线程池参数的.
  5. 当线程池还没达到 corePoolSize 的时候, 线程池里面有空闲线程, 这个时候来了一个新的任务, 线程池是创建新的线程还是使用空闲线程 ?

路过点赞, 月入10w

· 2 min read
jeesk

log4j-slf4j-impl: log4j的日志转到slf4j上

LoggerFactory.getLogger () 方法 寻找对应的logger

org.slf4j.LoggerFactory#findPossibleStaticLoggerBinderPathSet 寻找staticLoggerBinder

paths = loggerFactoryClassLoader.getResources(STATIC_LOGGER_BINDER_PATH); 通过路径寻找所有的binder, 这里的STATIC_LOGGER_BINDER_PATH = org/slf4j/impl/StaticLoggerBinder.class, 每个slf4j的具体实现类都有一个StaticLoggerBinder.class

org.slf4j.LoggerFactory#reportMultipleBindingAmbiguity 判断是否有多个binder, 如果有将会打印日志: SLF4J: Class path contains multiple SLF4J bindings. SLF4J: Found binding in [jar:file:/Z:/repository/org/slf4j/slf4j-simple/1.7.28/slf4j-simple-1.7.28.jar!/org/slf4j/impl/StaticLoggerBinder.class] SLF4J: Found binding in [jar:file:/Z:/repository/org/slf4j/slf4j-nop/1.7.28/slf4j-nop-1.7.28.jar!/org/slf4j/impl/StaticLoggerBinder.class] SLF4J: See http://www.slf4j.org/codes.html#multiple_bindings for an explanation.., 这个日志是我们常见的, 因为有多个日志实现

org/slf4j/impl/StaticLoggerBinder.class, 每个slf4j的日志实现都有这个类 找到所有绑定的logger

调用 StaticLoggerBinder.getSingleton(); 这里如果有多个class, 应该是按顺序调用第一个class的getSingleton(), 调用 reportActualBinding 打印绑定的是哪一个日志实现 SLF4J: Actual binding is of type [org.slf4j.impl.SimpleLoggerFactory] getILoggerFactory() 获得到刚才StaticLoggerBinder的日志工厂 SimpleLoggerFactory.getLogger public Logger getLogger(String name) { Logger simpleLogger = (Logger)this.loggerMap.get(name); if (simpleLogger != null) { return simpleLogger; } else { Logger newInstance = new SimpleLogger(name); Logger oldInstance = (Logger)this.loggerMap.putIfAbsent(name, newInstance); return (Logger)(oldInstance == null ? newInstance : oldInstance); } } 指定的logger 作缓存, 然后调用info() 方法打印日志.